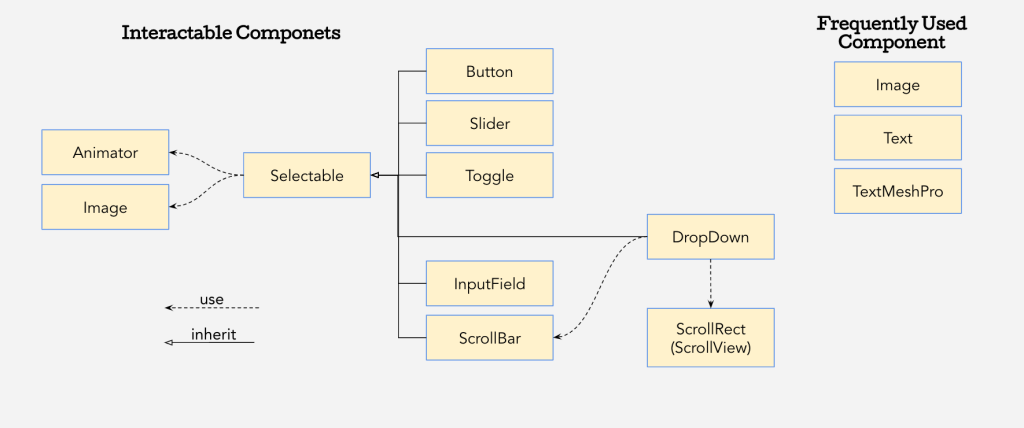
在 Unity 的 UI 系统中,Button 是最常见的可交互组件 之一(除此之外还有 Slider、Toggle、Input Field、Scroll Bar、Drop Down),其点击事件不仅是开发者构建用户交互的基础,更是一个复杂而精巧的功能模块。本文将从 UGUI 的源码层面出发,全面剖析 Button 点击事件的实现原理,理解其设计思路与内部逻辑。
按钮点击的触发流程
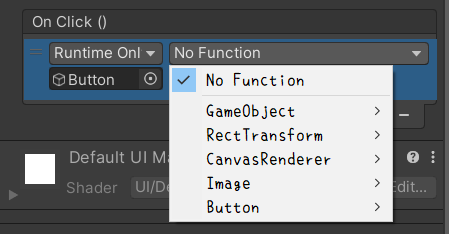
相信每个介绍 UGUI 的新手视频都会讲到 Button 的点击事件。在 Unity 中,如果我们想为一个按钮添加事件有两种实现方式 ,一种是直接在检查器上为该按钮绑定事件:
另一种是通过代码为按钮的 onClick 加上方法监听:
1
2
3
GetComponent<Button>().onClick.AddListener(() => { ... });
这两者是等价的。让我们沿着 onClick 的调用链一步一步看看是怎么回事吧。
我们来看看 Button 的源码吧!在 UGUI 的源码中,Button 是一个继承自 Selectable 的类。Selectable 提供了 UI 组件的基础选择功能 ,如焦点状态、交互状态等。Button 在 Selectable 的基础上扩展了点击事件处理能力(onClick 方法)。
1
2
3
4
5
6
7
8
9
10
11
12
13
14
15
16
17
18
19
20
21
22
23
24
25
26
27
28
29
30
31
32
33
34
35
36
37
38
39
40
41
42
43
44
45
46
47
48
49
50
51
52
53
54
55
56
57
58
59
60
61
62
63
64
65
66
67
68
69
70
71
72
using System;using System.Collections;using UnityEngine.Events;using UnityEngine.EventSystems;using UnityEngine.Serialization;namespace UnityEngine.UI { [AddComponentMenu("UI/Button" , 30) ] public class Button : Selectable , IPointerClickHandler , ISubmitHandler { [Serializable ] public class ButtonClickedEvent : UnityEvent {} [FormerlySerializedAs("onClick" ) ] [SerializeField ] private ButtonClickedEvent m_OnClick = new ButtonClickedEvent(); protected Button () public ButtonClickedEvent onClick { get { return m_OnClick; } set { m_OnClick = value ; } } private void Press () if (!IsActive() || !IsInteractable()) return ; UISystemProfilerApi.AddMarker("Button.onClick" , this ); m_OnClick.Invoke(); } public virtual void OnPointerClick (PointerEventData eventData ) if (eventData.button != PointerEventData.InputButton.Left) return ; Press(); } public virtual void OnSubmit (BaseEventData eventData ) Press(); if (!IsActive() || !IsInteractable()) return ; DoStateTransition(SelectionState.Pressed, false ); StartCoroutine(OnFinishSubmit()); } private IEnumerator OnFinishSubmit () var fadeTime = colors.fadeDuration; var elapsedTime = 0f ; while (elapsedTime < fadeTime) { elapsedTime += Time.unscaledDeltaTime; yield return null ; } DoStateTransition(currentSelectionState, false ); } } }
我们发现,鼠标点击时最终调用的是 Press 方法,里面执行了 onClick 委托链 上挂载的方法。Press 被包裹进 OnPointerClick 方法里,而这个 OnPointerClick 是 IPointerClickHandler 接口下的方法实现(这个接口也仅包括该方法):
1
2
3
4
public interface IPointerClickHandler : IEventSystemHandler { void OnPointerClick (PointerEventData eventData ) }
ExecuteEvents:Execute -> s_PointerClickHandler -> pointerClickHandler
查找 OnPointerClick 的调用链,我们会发现该方法是由 ExecuteEvents 类下的 Execute 方法调用的。ExecuteEvents 类 相当于事件执行器 ,提供了许多通用的事件处理方法,针对按钮点击类型的 Execute 只是其中的一种重载 。Execute 方法被赋值给 s_PointerClickHandler 字段,该字段由 pointerClickHandler 方法封装提供。
1 2 3 4 5 6 7 8 9 10 private static readonly EventFunction<IPointerClickHandler> s_PointerClickHandler = Execute;private static void Execute (IPointerClickHandler handler, BaseEventData eventData ) handler.OnPointerClick(ValidateEventData<PointerEventData>(eventData)); } public static EventFunction<IPointerClickHandler> pointerClickHandler { get { return s_PointerClickHandler; } }
沿着调用链继续往上,我们会找到两个脚本: TouchInputModule 和 StandaloneInputModule 。这两个类都继承自 BaseInput ,主要作用是输入处理 :
TouchInputModule :专为触摸屏设备(如:手机)设计,主要用于处理移动设备上的触摸输入,它支持单点触摸、多点触摸等功能。不支持鼠标和键盘StandaloneInputModule 是一个通用的输入模块,能够支持多种输入方式,包括鼠标、键盘和触摸屏输入。
假设我们的项目是一个电脑游戏,那么我们就会用鼠标去点击这个 Button,也就对应了 StandaloneInputModule 中的下面两个方法:
1 2 3 4 5 6 7 8 9 10 11 12 13 14 15 16 17 18 19 20 21 22 23 24 25 26 27 protected void ProcessMousePress (MouseButtonEventData data ) ... var pointerEvent = data.buttonData; var currentOverGo = pointerEvent.pointerCurrentRaycast.gameObject; if (data.ReleasedThisFrame()) { ReleaseMouse(pointerEvent, currentOverGo); } ... } private void ReleaseMouse (PointerEventData pointerEvent, GameObject currentOverGo ) ExecuteEvents.Execute(pointerEvent.pointerPress, pointerEvent, ExecuteEvents.pointerUpHandler); var pointerClickHandler = ExecuteEvents.GetEventHandler<IPointerClickHandler>(currentOverGo); if (pointerEvent.pointerPress == pointerUpHandler && pointerEvent.eligibleForClick) { ExecuteEvents.Execute(pointerEvent.pointerPress, pointerEvent, ExecuteEvents.pointerClickHandler); } ... }
追寻 ProcessMousePress 方法的调用链,最后来到了输入模块的 Process 方法这里。该方法在 EventSystem 的 Update 里逐帧检查事件是否被触发。Process 方法会处理鼠标的按下、抬起等事件,当鼠标抬起时调用 ReleaseMouse 方法,并最终调用 Execute 方法并触发 IPointerClick 事件。
所以兜兜转转一圈,居然又回到了 ExecuteEvents 的 Execute 方法上。不过这里调用的 Execute 和前面出现的并不相同,而是:
1 2 3 4 5 6 7 8 9 10 11 12 13 14 15 16 17 18 19 20 21 22 23 24 25 26 27 28 29 public static bool Execute <T >(GameObject target, BaseEventData eventData, EventFunction<T> functor ) where T : IEventSystemHandler var internalHandlers = ListPool<IEventSystemHandler>.Get(); GetEventList<T>(target, internalHandlers); var internalHandlersCount = internalHandlers.Count; for (var i = 0 ; i < internalHandlersCount; i++) { T arg; try { arg = (T)internalHandlers[i]; } catch (Exception e) { var temp = internalHandlers[i]; Debug.LogException(new Exception(string .Format("Type {0} expected {1} received." , typeof (T).Name, temp.GetType().Name), e)); continue ; } try { functor(arg, eventData); } catch (Exception e) { Debug.LogException(e); } } var handlerCount = internalHandlers.Count; ListPool<IEventSystemHandler>.Release(internalHandlers); return handlerCount > 0 ; }
UGUI的事件系统
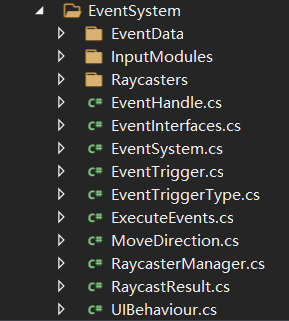
在刚才梳理 Button 点击响应的过程中,我们看到了不少新概念,相信大家也产生了一些疑问,比如:最终调用的 Execute 方法的 target 参数是如何通过 EventData 拿到对应 UI 元素的值的?在更深入理解 Button 的点击事件之前,我们需要先简单了解一下 UGUI 的事件系统 。以下是事件系统的文件目录:
UGUI 的事件系统是一个模块化的、基于事件驱动的交互框架,从目录结构中可以看到,EventSystem 的核心由以下几部分组成:
EventSystem :事件分发中心,负责管理 用户输入与事件分发,一个场景只能包含一个 EventSystem。它主要包含以下功能:
管理哪个游戏对象被认为是选中的
管理正在使用的输入模块
管理射线检测(如果需要)
根据需要更新所有输入模块
InputModules :输入模块,包含 StandaloneInputModule 和 TouchInputModule 两种具体实现,负责处理 不同平台的输入行为。输入模块的主要任务有三个,分别是:
Raycasters :射线检测模块,将输入位置映射到 UI 元素上,检测当前输入事件需要发送到哪里。系统提供了以下几种类型的 Raycaster:
Graphic Raycaster :检测 UI 元素PanelRaycaster :检测 UI Toolkit的面板实例Physics 2D Raycaster :用于 2D 物理元素Physics Raycaster :用于 3D 物理元素
这些模块共同协作,为 UGUI 提供了灵活的交互能力。
EventSystem
EventSystem 与多个模块协同工作,主要负责保持(保存)状态 并将功能委托给特定的组件。
当事件系统启动时,它会搜索连接到同一游戏对象的任何 BaseInputModules ,并将它们添加到内部列表中。更新时,每个附加模块都会收到 UpdateModules 调用,模块可以在此修改内部状态。每个模块更新后,活动模块将执行 Process 调用。
管理输入模块
EventSystem 的源码采用了 BaseInputModule 类型的 List 和变量保存输入模块:
1 2 3 4 private List<BaseInputModule> m_SystemInputModules = new List<BaseInputModule>();private BaseInputModule m_CurrentInputModule;
在 BaseInputModule 的 OnEnable 和 OnDisable 中,脚本会查找场景中所有的输入模块并赋值给 m_SystemInputModules 字段。
1
2
3
4
5
6
7
8
9
10
11
12
public void UpdateModules () GetComponents(m_SystemInputModules); var systemInputModulesCount = m_SystemInputModules.Count; for (int i = systemInputModulesCount - 1 ; i >= 0 ; i--) { if (m_SystemInputModules[i] && m_SystemInputModules[i].IsActive()) continue ; m_SystemInputModules.RemoveAt(i); } }
接下来,EventSystem 会在 TickModules 方法中逐个更新每一个输入模块。
1
2
3
4
5
6
7
8
private void TickModules () var systemInputModulesCount = m_SystemInputModules.Count; for (var i = 0 ; i < systemInputModulesCount; i++) { if (m_SystemInputModules[i] != null ) m_SystemInputModules[i].UpdateModule(); } }
UpdateModule 方法用于更新输入模块的状态 ,主要目的是处理触摸事件(对 StandaloneInputModule 的覆写则涵盖了鼠标事件等)的状态变化,确保窗口失去焦点时不会留下未处理的拖拽或输入状态。
1
2
3
4
5
6
7
8
9
10
11
12
13
14
public override void UpdateModule () if (!eventSystem.isFocused && ShouldIgnoreEventsOnNoFocus()) { if (m_InputPointerEvent != null && m_InputPointerEvent.pointerDrag != null && m_InputPointerEvent.dragging) { ReleaseMouse(m_InputPointerEvent, m_InputPointerEvent.pointerCurrentRaycast.gameObject); } m_InputPointerEvent = null ; return ; } m_LastMousePosition = m_MousePosition; m_MousePosition = input.mousePosition; }
EventSystem 对输入模块主要的管理在 Update 生命周期函数里,通过前文介绍过的 TickModules 方法更新输入模块,并 在满足条件的情况下调用当前模块的 Process 方法:
1
2
3
4
5
6
7
8
9
10
11
12
13
14
15
16
17
18
19
20
21
22
23
24
25
26
27
28
29
30
31
32
33
34
35
36
protected virtual void Update () TickModules(); bool changedModule = false ; var systemInputModulesCount = m_SystemInputModules.Count; for (var i = 0 ; i < systemInputModulesCount; i++) { var module = m_SystemInputModules[i]; if (module.IsModuleSupported() && module.ShouldActivateModule()) { if (m_CurrentInputModule != module) { ChangeEventModule(module); changedModule = true ; } break ; } } if (m_CurrentInputModule == null ) { for (var i = 0 ; i < systemInputModulesCount; i++) { var module = m_SystemInputModules[i]; if (module.IsModuleSupported()) { ChangeEventModule(module); changedModule = true ; break ; } } } if (!changedModule && m_CurrentInputModule != null ) m_CurrentInputModule.Process(); }
以 StandaloneInputModule 为例,其中的 Process 覆写长这样:
1
2
3
4
5
6
7
8
9
10
11
12
13
14
15
16
17
18
19
20
21
22
23
24
25
26
27
28
29
30
public override void Process () if (!eventSystem.isFocused && ShouldIgnoreEventsOnNoFocus()) return ; bool usedEvent = SendUpdateEventToSelectedObject(); if (!ProcessTouchEvents() && input.mousePresent) ProcessMouseEvent(); if (eventSystem.sendNavigationEvents) { if (!usedEvent) usedEvent |= SendMoveEventToSelectedObject(); if (!usedEvent) SendSubmitEventToSelectedObject(); } } protected bool SendUpdateEventToSelectedObject () if (eventSystem.currentSelectedGameObject == null ) return false ; var data = GetBaseEventData(); ExecuteEvents.Execute(eventSystem.currentSelectedGameObject, data, ExecuteEvents.updateSelectedHandler); return data.used; }
这里的 Process 方法就是我们在先前在 Button 点击事件调用链上找到的 Process,主要作用是捕获各种输入事件 (如点击、拖拽等),通过 ExecuteEvents.Execute 方法执行 updateSelected 事件 ,更新 EventSystem 中当前选中的 GameObject (即 m_CurrentSelected )。有个这个“选中对象”,我们就知道触发事件的对象具体是哪个 UI 元素了,那么 EventSystem 是如何管理选中的游戏对象的呢?
管理选中的游戏对象
EventSystem 是通过一个用于储存当前选中对象的字段 m_CurrentSelected 来管理选中物体的。当场景中的可交互 UI 元素(例如 Button、Dropdown、InputField 等)被选中时,会通知之前选中的对象执行被取消 (OnDeselect )事件,通知当前选中的对象执行选中 (OnSelect )事件,部分代码如下:
1
2
3
4
5
6
7
8
9
10
private GameObject m_CurrentSelected;public void SetSelectedGameObject (GameObject selected, BaseEventData pointer ) ...... ExecuteEvents.Execute(m_CurrentSelected, pointer, ExecuteEvents.deselectHandler); m_CurrentSelected = selected; ExecuteEvents.Execute(m_CurrentSelected, pointer, ExecuteEvents.selectHandler); m_SelectionGuard = false ; }
管理射线检测
那么问题来了,我们怎么知道一个 UI 元素被选中了呢?这就是射线 (Raycast)的作用了。EventSystem 中有一个非常重要的函数 RaycastAll,主要作用就是获取目标。它被 PointerInputModule 类调用,即当鼠标设备可用或触摸板被使用时被调用。
1
2
3
4
5
6
7
8
9
10
11
12
13
14
15
16
public void RaycastAll (PointerEventData eventData, List<RaycastResult> raycastResults ) raycastResults.Clear(); var modules = RaycasterManager.GetRaycasters(); var modulesCount = modules.Count; for (int i = 0 ; i < modulesCount; ++i) { var module = modules[i]; if (module == null || !module.IsActive()) continue ; module.Raycast(eventData, raycastResults); } raycastResults.Sort(s_RaycastComparer); }
它首先获取所有的 BaseRaycast 对象,然后调用它们的 Raycast 方法,用以获取屏幕某个点下的所有目标,最后对得到的结果进行排序。大部分情况下排序都是根据深度 (Depth)进行排序的,在一些情况下也会使用距离 (Distance)、排序顺序 (SortingOrder,如果是UI元素则是根据Canvas面板的 Sort order 值,3D 物体默认是 0)或者排序层级 (Sorting Layer)等作为排序依据。排序过后,raycastResults 中最前的目标就被认为成射线击中的对象。
总结一下,EventSystem 会在 Update 中调用输入模块的 Process 方法来处理输入消息,PointerInputModule 会调用 EventSystem 中的 RaycastAll 方法进行射线检测,RaycastAll 又会调用 BastRaycaster 的 Raycast 方法执行具体的射线检测操作,主要是获取被选中的目标信息。
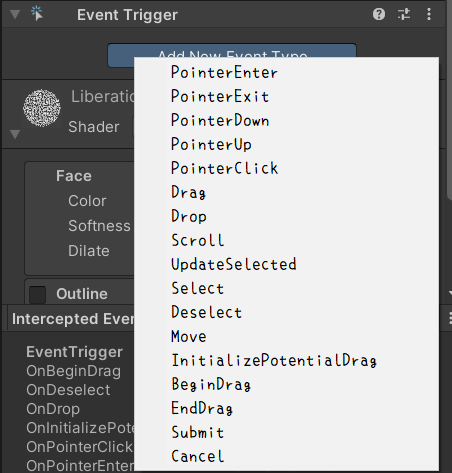
在讲 Button 的时候我们提到鼠标的点击事件是在 BaseInputModule 中触发的,除此之外,EventInterface 接口中的其他事件(也就是我们通过 Event Trigger 能为对象添加的所有事件类型)也都是由输入模块产生的。
各个不同的事件的具体触发条件如下:
pointerEnterHandler 、pointerExitHandler :当鼠标或触摸进入、退出当前对象时执行。pointerDownHandler、pointerUpHandler :在鼠标或者触摸按下、松开时执行。pointerClickHandler :在鼠标或触摸松开并且与按下时是同一个响应物体时执行。beginDragHandler :在鼠标或触摸位置发生偏移(偏移值大于一个很小的常量)时执行。initializePotentialDrag :在鼠标或者触摸按下且当前对象可以响应拖拽事件时执行。dragHandler :对象正在被拖拽且鼠标或触摸移动时执行。endDragHandler :对象正在被拖拽且鼠标或触摸松开时执行。dropHandler :鼠标或触摸松开且对象未响应 pointerClickHandler 情况下,如果对象正在被拖拽则执行。scrollHandler :当鼠标滚动差值大于 0 执行。updateSelectedHandler :当输入模块切换到 StandaloneInputModule 时执行。(不需要Input类)selectHandler 、deselectHandler :当鼠标移动导致被选中的对象改变时,执行。导航事件 :导航可用的情况下,
按上下左右键执行 moveHandler
按确认键执行 submitHandler
按取消键执行 cancelHandler 。
更加底层的调用还是UnityEngine.Input类,但可惜的是这部分Unity并没有开源。
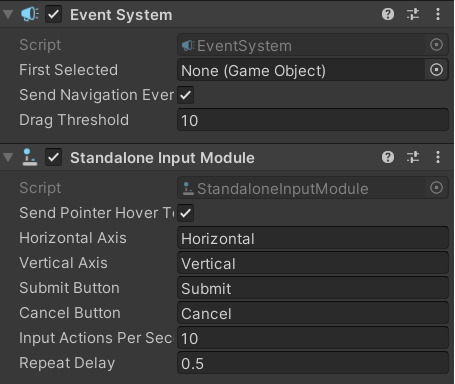
每次事件系统中只能有一个 输入模块处于活跃状态,并且必须与 EventSystem 组件处于相同的游戏对象上。
执行事件
InputModule 可以处理设备输入,然后发送事件到场景对象,那这些事件是怎么执行的呢?在讲 Button 的时候,我们提到过 ExecuteEvent 类,其实事件的执行都是通过这个类进行的,不过也需要 EventInterface 接口配合。
InputModule 类中定义了许多接口,比如鼠标按下、点击、拖拽等。ExecuteEvent 类中提供了一个方法让外部统一调用以执行事件,也就是前面提到的泛型 Execute 方法,主要就是查找 target 对象上的 T 类型的组件列表,并遍历执行。
除此之外,还有一个 GetEventHandler 方法,它主要是通过冒泡 的方式查找到能够处理指定事件的对象。冒泡是什么意思?比如我们在场景中创建了一个 Button,这个 Button 还包含了一个 Text 组件,当鼠标点击到按钮上的文本时就会调用 GetEventHandler 函数。该函数的 root 参数其实是 Text,但是会通过冒泡的方式查找到它的父物体 Button,然后调用 Button 的点击事件。
1 2 3 4 5 6 7 8 9 10 11 12 13 14 15 16 17 18 19 20 21 22 23 24 public static GameObject GetEventHandler <T >(GameObject root ) where T : IEventSystemHandler if (root == null ) return null ; Transform t = root.transform; while (t != null ) { if (CanHandleEvent<T>(t.gameObject)) return t.gameObject; t = t.parent; } return null ; } public static bool CanHandleEvent <T >(GameObject go ) where T : IEventSystemHandler var internalHandlers = s_HandlerListPool.Get(); GetEventList<T>(go, internalHandlers); var handlerCount = internalHandlers.Count; s_HandlerListPool.Release(internalHandlers); return handlerCount != 0 ; }
Raycasters
BaseRaycaster 是其他 Raycaster 的基类。在它的 OnEnable 里将自己注册到 RaycasterManager ,并在 OnDisable 的时候从 RaycasterManager 中移除。这个 RaycasterManager 是一个静态类,维护了一个 BaseRaycaster 类型的 List,功能比较简单,包含获取 (Get)、添加 (Add)、移除 (Remove)方法。
BaseRaycaster 中最重要的就是 Raycast 方法了。对于 UI 元素来说,BaseRaycaster 有两个子类:PanelRaycaster 和 GraphicRaycaster ,它们都对该方法进行了重写,以实现对应的射线方法。我们来分析一下 GraphicRaycaster 吧。
GraphicRaycast
GraphicRaycast 用于检测 UI 元素,它依赖于 Canvas,我们在场景中添加 Canvas 默认都会包含一个 GraphicRaycast 组件:
GraphicRaycast 的 Raycast 方法先获取鼠标坐标 ,将其转换为 Camera 的视角坐标 ,然后分情况计算射线的距离 (hitDistance),调用 Graphic 的 Raycast 方法来获取鼠标点下方的元素,最后将满足条件的结果添加到 resultAppendList 中。
1 2 3 4 5 6 7 8 9 10 11 12 13 14 15 16 17 18 19 20 21 22 23 24 25 26 27 28 29 30 31 32 33 34 35 36 37 38 39 40 41 42 43 44 45 46 47 48 49 50 51 52 53 54 55 56 57 58 59 60 61 62 63 64 65 66 67 68 69 70 71 72 73 74 75 76 77 78 79 80 81 82 83 84 85 86 87 88 89 90 91 92 93 94 95 96 97 98 99 100 101 102 103 104 105 106 107 108 109 110 111 112 113 114 115 116 117 118 119 120 121 122 123 124 125 126 127 128 129 130 131 132 133 134 135 136 137 138 public override void Raycast (PointerEventData eventData, List<RaycastResult> resultAppendList ) if (canvas == null ) return ; var canvasGraphics = GraphicRegistry.GetRaycastableGraphicsForCanvas(canvas); if (canvasGraphics == null || canvasGraphics.Count == 0 ) return ; int displayIndex; var currentEventCamera = eventCamera; if (canvas.renderMode == RenderMode.ScreenSpaceOverlay || currentEventCamera == null ) displayIndex = canvas.targetDisplay; else displayIndex = currentEventCamera.targetDisplay; var eventPosition = Display.RelativeMouseAt(eventData.position); if (eventPosition != Vector3.zero) { int eventDisplayIndex = (int )eventPosition.z; if (eventDisplayIndex != displayIndex) return ; } else { eventPosition = eventData.position; } Vector2 pos; if (currentEventCamera == null ) { float w = Screen.width; float h = Screen.height; if (displayIndex > 0 && displayIndex < Display.displays.Length) { w = Display.displays[displayIndex].systemWidth; h = Display.displays[displayIndex].systemHeight; } pos = new Vector2(eventPosition.x / w, eventPosition.y / h); } else pos = currentEventCamera.ScreenToViewportPoint(eventPosition); if (pos.x < 0f || pos.x > 1f || pos.y < 0f || pos.y > 1f ) return ; float hitDistance = float .MaxValue; Ray ray = new Ray(); if (currentEventCamera != null ) ray = currentEventCamera.ScreenPointToRay(eventPosition); if (canvas.renderMode != RenderMode.ScreenSpaceOverlay && blockingObjects != BlockingObjects.None) { float distanceToClipPlane = 100.0f ; if (currentEventCamera != null ) { float projectionDirection = ray.direction.z; distanceToClipPlane = Mathf.Approximately(0.0f , projectionDirection) ? Mathf.Infinity : Mathf.Abs((currentEventCamera.farClipPlane - currentEventCamera.nearClipPlane) / projectionDirection); } #if PACKAGE_PHYSICS if (blockingObjects == BlockingObjects.ThreeD || blockingObjects == BlockingObjects.All) { if (ReflectionMethodsCache.Singleton.raycast3D != null ) { var hits = ReflectionMethodsCache.Singleton.raycast3DAll(ray, distanceToClipPlane, (int )m_BlockingMask); if (hits.Length > 0 ) hitDistance = hits[0 ].distance; } } #endif #if PACKAGE_PHYSICS2D if (blockingObjects == BlockingObjects.TwoD || blockingObjects == BlockingObjects.All) { if (ReflectionMethodsCache.Singleton.raycast2D != null ) { var hits = ReflectionMethodsCache.Singleton.getRayIntersectionAll(ray, distanceToClipPlane, (int )m_BlockingMask); if (hits.Length > 0 ) hitDistance = hits[0 ].distance; } } #endif } m_RaycastResults.Clear(); Raycast(canvas, currentEventCamera, eventPosition, canvasGraphics, m_RaycastResults); int totalCount = m_RaycastResults.Count; for (var index = 0 ; index < totalCount; index++) { var go = m_RaycastResults[index].gameObject; bool appendGraphic = true ; if (ignoreReversedGraphics) { if (currentEventCamera == null ) { var dir = go.transform.rotation * Vector3.forward; appendGraphic = Vector3.Dot(Vector3.forward, dir) > 0 ; } else { var cameraForward = currentEventCamera.transform.rotation * Vector3.forward * currentEventCamera.nearClipPlane; appendGraphic = Vector3.Dot(go.transform.position - currentEventCamera.transform.position - cameraForward, go.transform.forward) >= 0 ; } } if (appendGraphic) { float distance = 0 ; Transform trans = go.transform; Vector3 transForward = trans.forward; if (currentEventCamera == null || canvas.renderMode == RenderMode.ScreenSpaceOverlay) distance = 0 ; else { distance = (Vector3.Dot(transForward, trans.position - ray.origin) / Vector3.Dot(transForward, ray.direction)); if (distance < 0 ) continue ; } if (distance >= hitDistance) continue ; var castResult = new RaycastResult { ...... }; resultAppendList.Add(castResult); } } }
这个提供给 EventSystem 使用的 Raycast 方法里调用了 Raycast 的重载,该方法位于 GraphicRaycaster 的第326行,其作用是向屏幕投射射线并收集屏幕下方所有挂载了 Graphic 脚本的游戏对象,将结果储存到 m_RaycastResults 字段中。该重载方法的内容为:
1 2 3 4 5 6 7 8 9 10 11 12 13 14 15 16 17 18 19 20 21 22 23 24 25 26 27 28 29 30 31 32 33 34 [NonSerialized ] static readonly List<Graphic> s_SortedGraphics = new List<Graphic>(); private static void Raycast (Canvas canvas, Camera eventCamera, Vector2 pointerPosition, IList<Graphic> foundGraphics, List<Graphic> results ) int totalCount = foundGraphics.Count; for (int i = 0 ; i < totalCount; ++i) { Graphic graphic = foundGraphics[i]; if (!graphic.raycastTarget || graphic.canvasRenderer.cull || graphic.depth == -1 ) continue ; if (!RectTransformUtility.RectangleContainsScreenPoint(graphic.rectTransform, pointerPosition, eventCamera, graphic.raycastPadding)) continue ; if (eventCamera != null && eventCamera.WorldToScreenPoint(graphic.rectTransform.position).z > eventCamera.farClipPlane) continue ; if (graphic.Raycast(pointerPosition, eventCamera)) { s_SortedGraphics.Add(graphic); } } s_SortedGraphics.Sort((g1, g2) => g2.depth.CompareTo(g1.depth)); totalCount = s_SortedGraphics.Count; for (int i = 0 ; i < totalCount; ++i) results.Add(s_SortedGraphics[i]); s_SortedGraphics.Clear(); }
从上面的源码中可以发现,这个 Raycast 方法中又套了一层 Raycast 方法(已经套了三层了),该方法位于 Graphic 类(RawImage、Image 和 Text 都间接继承自 Graphic)下。这个 Raycast 向场景中进行光线投射时,它主要会做两件事:
使用 RectTransform 的值过滤元素
使用 Raycast 函数确定射线击中的元素
1 2 3 4 5 6 7 8 9 10 11 12 13 14 15 16 17 18 19 20 21 22 23 24 25 26 27 28 29 30 31 32 33 34 35 36 37 38 39 40 41 42 43 44 45 46 47 48 49 50 51 public virtual bool Raycast (Vector2 sp, Camera eventCamera ) if (!isActiveAndEnabled) return false ; var t = transform; var components = ListPool<Component>.Get(); bool ignoreParentGroups = false ; bool continueTraversal = true ; while (t != null ) { t.GetComponents(components); for (var i = 0 ; i < components.Count; i++) { var canvas = components[i] as Canvas; if (canvas != null && canvas.overrideSorting) continueTraversal = false ; var filter = components[i] as ICanvasRaycastFilter; if (filter == null ) continue ; var raycastValid = true ; var group = components[i] as CanvasGroup; if (group != null ) { if (ignoreParentGroups == false && group .ignoreParentGroups) { ignoreParentGroups = true ; raycastValid = filter.IsRaycastLocationValid(sp, eventCamera); } else if (!ignoreParentGroups) raycastValid = filter.IsRaycastLocationValid(sp, eventCamera); } else { raycastValid = filter.IsRaycastLocationValid(sp, eventCamera); } if (!raycastValid) { ListPool<Component>.Release(components); return false ; } } t = continueTraversal ? t.parent : null ; } ListPool<Component>.Release(components); return true ; }
源码中有一个频繁出现的方法 IsRaycastLocationValid。该方法位于 ICanvasRaycastFilter 接口,用来判断测试点(sp)是否有效。如果无效则会返回 false ,图形不会被加入前面的 s_SortedGraphics 列表中。
IsRaycastLocationValid 方法的实现很简单:
1
2
3
4
5
6
7
8
9
10
11
12
13
14
15
16
17
18
19
20
21
22
23
24
25
26
27
28
29
30
31
32
33
34
35
36
public virtual bool IsRaycastLocationValid (Vector2 screenPoint, Camera eventCamera ) if (alphaHitTestMinimumThreshold <= 0 ) return true ; if (alphaHitTestMinimumThreshold > 1 ) return false ; if (activeSprite == null ) return true ; Vector2 local; if (!RectTransformUtility.ScreenPointToLocalPointInRectangle(rectTransform, screenPoint, eventCamera, out local)) return false ; Rect rect = GetPixelAdjustedRect(); local.x += rectTransform.pivot.x * rect.width; local.y += rectTransform.pivot.y * rect.height; local = MapCoordinate(local, rect); Rect spriteRect = activeSprite.textureRect; float x = (spriteRect.x + local.x) / activeSprite.texture.width; float y = (spriteRect.y + local.y) / activeSprite.texture.height; try { return activeSprite.texture.GetPixelBilinear(x, y).a >= alphaHitTestMinimumThreshold; } catch (UnityException e) { Debug.LogError("Using alphaHitTestMinimumThreshold greater than 0 on Image whose sprite texture cannot be read. " + e.Message + " Also make sure to disable sprite packing for this sprite." , this ); return true ; } }
再看点击事件
最后,我们再来回顾一下 Button 的点击事件是怎么触发的。首先是 EventSystem 在 Update 中调用当前输入模块的 Process 方法处理所有的鼠标事件,并且输入模块会调用 RaycastAll 来得到目标信息,通过冒泡的方式找到事件实际接收者并执行点击事件。
用户输入捕获:
射线检测:
事件分发:
事件回调:
在实际开发中,Button 的默认功能可能无法满足需求。通过继承 Button 类,我们可以扩展其行为,例如:
添加双击功能
1
2
3
4
5
6
7
8
9
10
11
12
13
14
15
public class DoubleClickButton : Button { private float lastClickTime; private const float doubleClickThreshold = 0.3f ; public UnityEvent onDoubleClick; public override void OnPointerClick (PointerEventData eventData ) base .OnPointerClick(eventData); if (Time.time - lastClickTime < doubleClickThreshold) { onDoubleClick.Invoke(); } lastClickTime = Time.time; } }
改变点击区域
通过重写射线检测逻辑,可以自定义 Button 的点击区域:
1
2
3
4
5
6
public class CustomHitButton : Button { public override bool IsRaycastLocationValid (Vector2 sp, Camera eventCamera ) return RectTransformUtility.RectangleContainsScreenPoint(rectTransform, sp, eventCamera); } }
性能优化
在复杂 UI 场景中,大量 Button 可能导致性能问题。以下是一些优化建议:
减少不必要的事件监听:如果 Button 的状态变化不需要动画,可以禁用 Animator。
合并 UI 元素:使用 Canvas 的批处理功能减少绘制调用。
合理规划事件回调:避免在 onClick 中执行复杂逻辑,尽量将耗时操作放在后台线程。
参考资料
https://zhuanlan.zhihu.com/p/437704772 https://kendevlog.wordpress.com/2019/05/16/unity-技巧-界面大變身-基礎篇/
